Guide to help you implement RAID 5 (striping with parity) on Windows Server.
RAID 5 (disk striping with parity)
RAID level 5 is disk striping with parity. With this technique, you will need a minimum of three hard disk drives to set up fault tolerance. Disk Management sizes the volumes on these drives identically.
RAID 5 is essentially an enhanced version of RAID 1 — with the key addition of fault tolerance. Fault tolerance ensures that the failure of a single drive won’t bring down the entire drive set. Instead, the set continues to function with disk operations directed at the remaining volumes in the set.
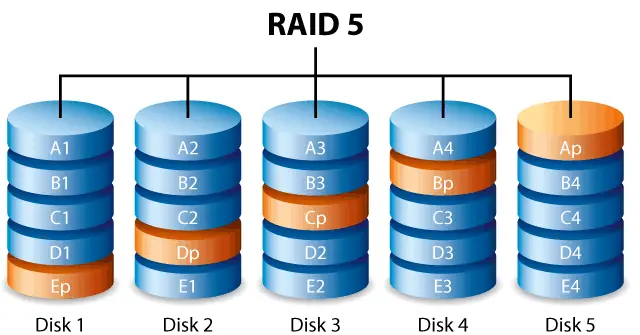
To allow for fault tolerance, RAID 5 writes parity checksums with the blocks of data. If any of the drives in the striped set fails, the parity information can be used to recover the data. This process is called regenerating the striped set. If two disks fail, however, the parity information isn’t sufficient to recover the data and you’ll need to rebuild the striped set from backup.
Creating a Striped Set with Parity in Disk Management
In Disk Management, you can create a striped set with parity by completing the following steps:
- In the Disk Management Graphical View, right-click an area marked Unallocated on a dynamic disk and then choose New Volume. This starts the New Volume Wizard. Read the welcome page, and then click Next.
- Select RAID-5 as the volume type. Create the volume as described previously under “Creating Volumes and Volume Sets.” The key difference is that you must select free space on three separate dynamic drives.
- Once you create a striped set, users can use the set just like they would a normal drive. Keep in mind that you can’t expand a striped set once it’s created. Because of this, you should carefully consider the setup before you implement it.