Guide to help you implementing RAID 0 on Windows Server. Follow these steps and you will be ok.
Implementing RAID 0 on Windows Server
A guide to help you implementing RAID 0 on Windows Server platform.
Windows Server technology can support disk mirroring (RAID 1), disk striping (RAID 0), and disk striping with parity (RAID 5). Implementing these RAID techniques is discussed in the sections that follow.
Caution
Some operating systems, such as MS-DOS, don’t support RAID. If you dual boot your system to one of these noncompliant operating systems, your RAID – configured drives will be unusable.
Implementing RAID 0
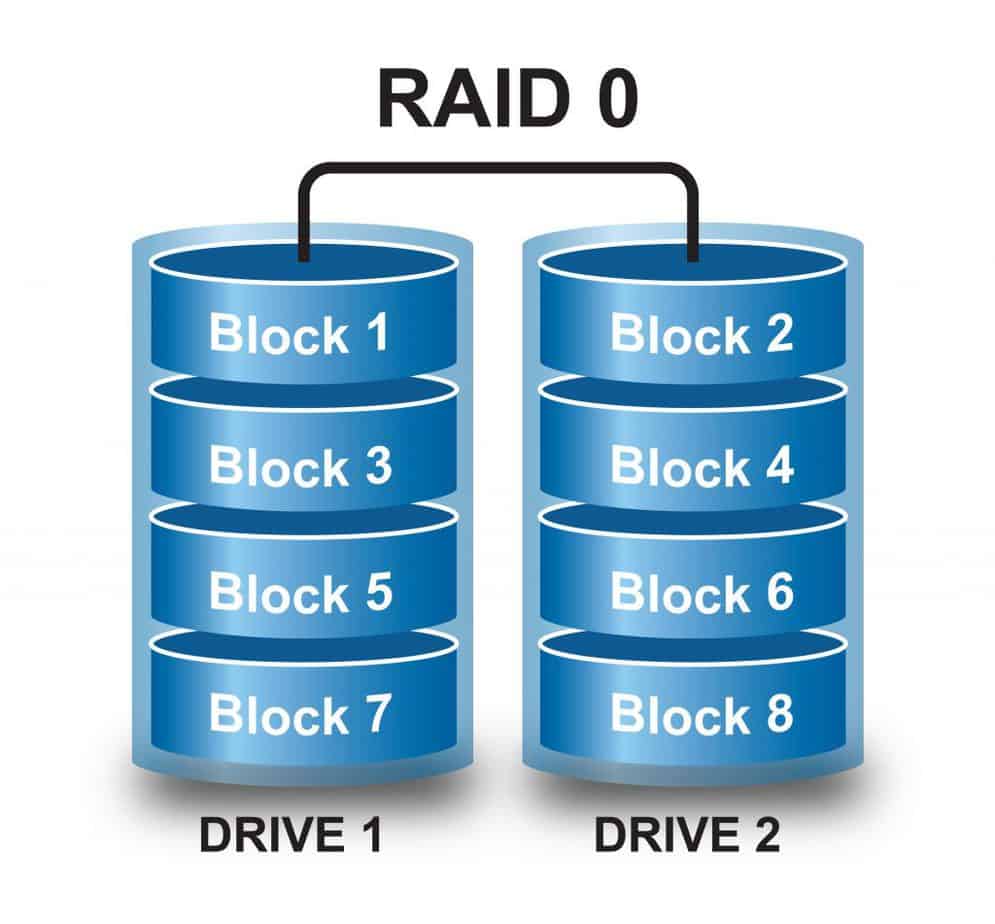
RAID level 0, or RAID 0 is the same that disk striping. With disk striping (RAID 0), two or more volumes – each on a separate drive – are configured as a striped set, the operating system will act like it has only one drive. Data written to the striped set is broken into blocks that are called stripes. These stripes are written sequentially to all drives in the striped set. You can place volumes for a striped set on up to 32 drives, but in most circumstances, sets with two to five volumes offer the best performance improvements. Beyond this, the performance improvement decreases significantly.
The major advantage of disk striping is speed. Data can be accessed on multiple disks using multiple drive heads, which improves performance considerably. However, this performance boost comes with a price tag. As with volume sets, if any hard disk drive in the striped set fails, the striped set can no longer be used, which means that essentially all data in the stripe set is lost. You’ll need to recreate the striped set and restore the data from backups.
Disk striping is the same as raid 0 (zero). When a set of several physical hard drives are striped to set a unique volume, that is raid 0.
Caution: The boot and system volumes shouldn’t be part of a striped set.
Don’t use disk striping with these volumes. When you create striped sets, you’ll want to use volumes that are approximately the same size. Disk Management bases the overall size of the striped set on the smallest volume size. Specifically, the maximum size of the striped set is a multiple of the smallest volume size. For example, if the smallest volume is 50 MB, the maximum size for the striped site is 150 MB.
When you create striped sets, you’ll want to use volumes that are approximately the same size. Disk Management bases the overall size of the striped set on the smallest volume size. Specifically, the maximum size of the striped set is a multiple of the smallest volume size. For example, if the smallest volume is 50 MB, the maximum size for the striped site is 150 MB.
To maximize the performance of the striped set, you can do several things:
- Use disks that are on separate disk controllers. This allows the system to simultaneously access the drives.
- Don’t use the disks containing the striped set for other purposes. This allows the disk to dedicate its time to the striped set.
Creating a striped set in Windows Server:
- In the Disk Management Graphical View, right-click an area marked Unallocated on a dynamic disk and then choose New Volume. This starts the New Volume Wizard. Read the welcome page, and then click Next.
- Select Striped as the volume type and create the volume. The key difference is that you need at least two dynamic disks to create a striped volume.
- Once you create a striped volume, you can use that volume just like any other volume. You can’t expand a striped set once it’s created. Because of this, you should carefully consider the setup before you implementing RAID 0.
Your Disk striping is now ready. You have RAID 0 up and running!