In this article, we’re going to learn the steps for the basic configuration of a Juniper router. There are significant differences between the Juniper router configurations compared to Cisco IOS. However, many of the steps and prompts are similar to the Cisco router configuration, as you’ll learn.
First of all, you should know that the operating system (OS) used by Juniper routers is called JUNOS. The JUNOS software offers two different operating modes:
JUNOS Operational Mode
The operational mode is the first mode encountered after logging in to the Juniper router. This mode allows the following:
- Monitoring network connectivity
- Troubleshooting the router interface and network connections
- Entry point for router configuration
The following examples demonstrate the basic commands used in the operational mode of the JUNOS command-line interface (CLI).
We can establish the connection with the router in operational mode from a secure SSH session or by connecting a serial cable directly to the router.
After connecting to the router, the first prompt displayed is the request for a password. After you correctly enter the password, you enter the router’s {master} mode, and the router> prompt is displayed, indicating that you are in the operational mode. The text preceding the > lists the name of the user and the router.
In this example, the username is net-admin and the router name is noc. Juniper routers use the {master} prompt to indicate that you are in the master routing engine mode. This prompt appears only when the Juniper router is equipped with two routing engines, and the two engines are running in a graceful switchover redundancy mode.
The following shows an example of the prompts displayed after establishing the router connection.
In this example, the connection is made by net-admin, and this user has superuser privileges. A superuser has root access with full access to all configuration modes. Notice that prompt is >, indicating you are now in operational mode.
Password:

{master}
net-admin@noc>
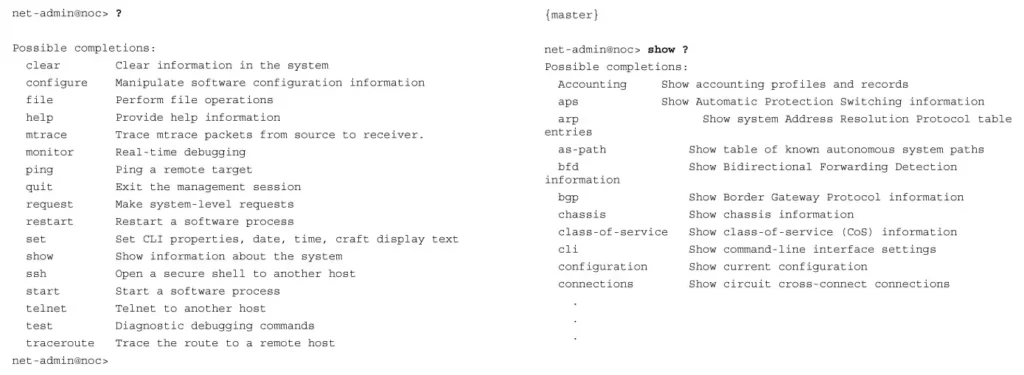
The question mark (?) is used for the universal help command in JUNOS (operating system). For example, the ? can be entered to see what options are available. It is not necessary to press Enter after typing the question mark. The following is a list of the available commands available at the > prompt and a partial listing of the options with the show ? command:
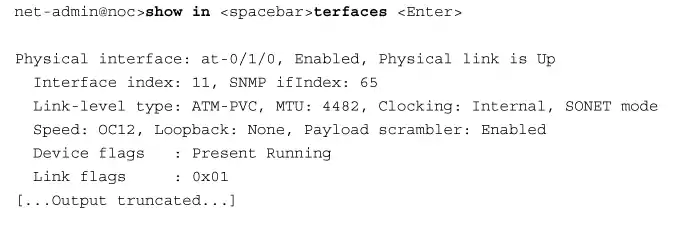
The JUNOS operating system has another option that enables the user to enter only part of a command. With this feature, the incomplete command will be completed by JUNOS if the user is still in the operational mode, indicated by the > prompt. This means the user doesn’t have to remember the full command. JUNOS will fill in the expected text given the information obtained from the entered keystrokes.
This is accomplished by entering a partial command and then pressing the spacebar or the tab key. For example, entering show in lists the remaining text of a possible matching command, terfaces. Press Enter to accept the displayed text.
The following is an example:
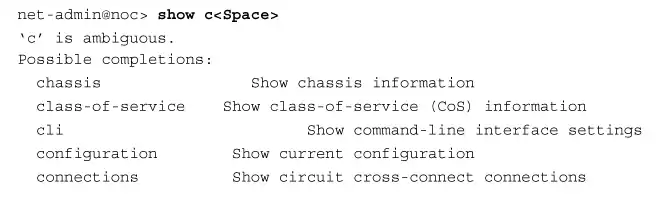
The following shows another example of entering an incomplete command where an ambiguous result can occur. For example, entering show c results in an ambiguous result, because there are many possible matching commands. In this case, the user must type more characters for JUNOS to recognize the desired command, or the user must type the complete command:
The next example demonstrates the results of entering the show version at the > prompt. This command can be used to show which version of the Juniper software is running on the router, and it also lists all the software suites installed on the router:
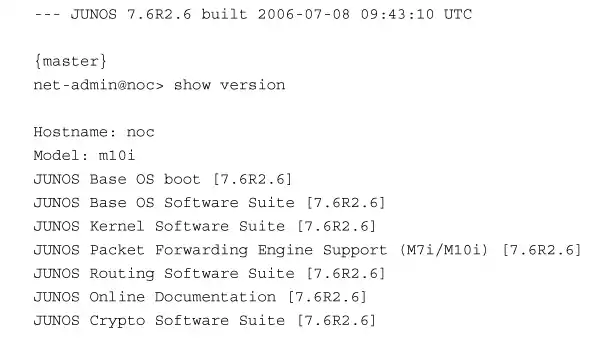
In this case, the router is running the Model: m10i software. The Juniper system is based on the UNIX OS platform. It has a Free BSD UNIX-based kernel with different software systems handling different functions. For example, this listing shows that there is a JUNOS routing software suite, a packet forwarding engine, a crypto software suite, and other software. This individual software suite setup allows one feature to be updated (for example, router updates) without having to update the entire router box.
The next example uses the show configuration command to display the Juniper router current configuration. This is analogous to entering the show running-config command on a Cisco router.
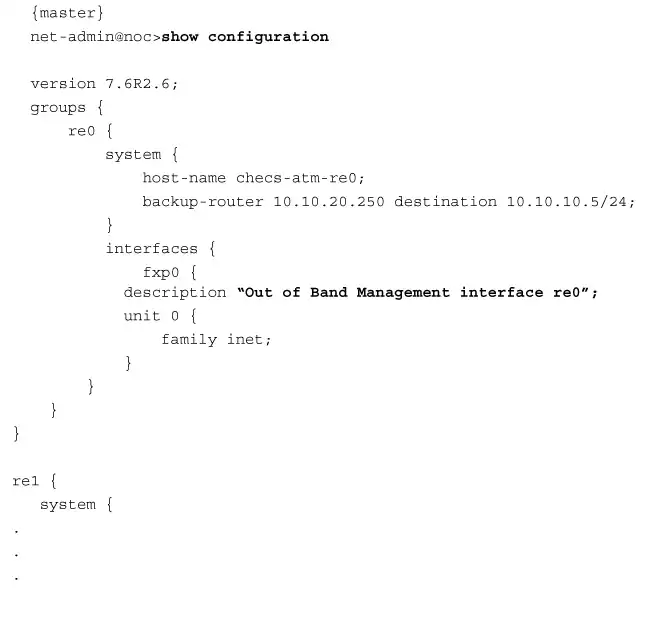
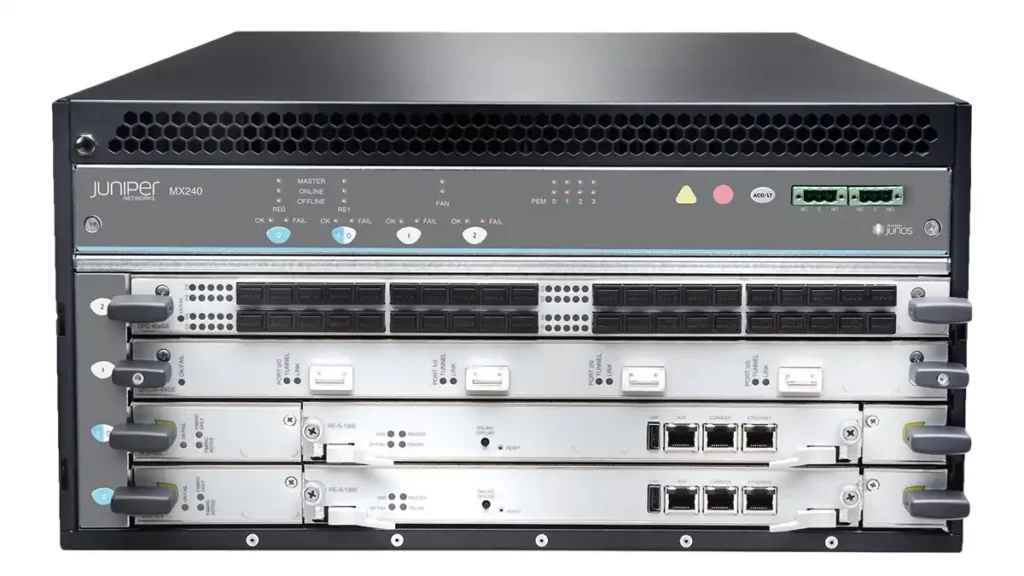
The re0 { and re1 { .. notations identify the system configuration for the routing engines 0 and 1. (The location of the routing engines on a Juniper router is shown in the next figure) The statement Out of Band Management indicates that the FastEthernet0 (fxp0) interface is an additional interface that can be used to connect to the router if the main network is down. The term “in band” refers to the primary network connection.
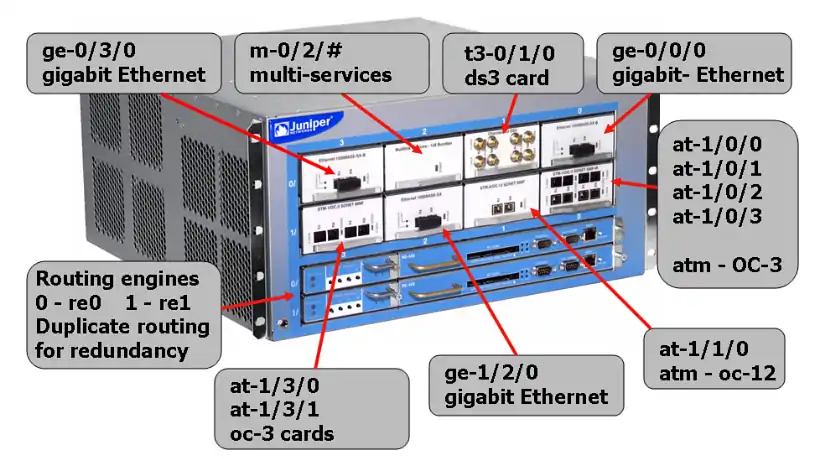
The Juniper router, shown in the Figure above, shows several types of physical interface cards (PIC). Each interface plus its name are listed. The ge interfaces are gigabit Ethernet. The multi-services card enables expanded services, such as stateful firewall protection, Network Address Translation, and other functions.
The t3/ds3 card provides for a 44.736-Mbps data rate connection. The at is for Asynchronous Transmission Mode (ATM), and this example also shows oc-3 (155.52 Mbps) and oc-12 (622.08 Mbps) connections. This router also has two routing engines; the duplicate engines are for redundancy.
re0 { and re1 { …
This identifies the system configuration for the routing engines 0 and 1.
Out of Band Management
Indicates that an additional interface can be used to connect to the router if the main network is down.
PIC
Physical interface card.
Multi-Services Card
Enables expanded services, such as stateful firewall protection and Network Address Translation.
t3/ds3 card
Provides for a 44.736-Mbps data rate connection.
at
Asynchronous Transmission Mode (ATM).
oc-3
155.52 Mbps.
oc-12
622.08 Mbps.
Network connectivity with other networking devices can be verified with the Juniper router by using the ping command, as shown next. This command is being issued in the operational mode, the > prompt.
{master}
net-admin@noc> ping 192.168.32.5
{master}
net-admin@noc-atm-re1> ping 172.16.83.3
PING 172.16.83.3 (172.16.83.3): 56 data bytes
64 bytes from 172.16.83.3: icmp_seq=0 ttl=62 time=1.493 ms
64 bytes from 172.16.83.3: icmp_seq=1 ttl=62 time=1.000 ms
64 bytes from 172.16.83.3: icmp_seq=2 ttl=62 time=1.096 ms
64 bytes from 172.16.83.3: icmp_seq=3 ttl=62 time=1.082 ms
64 bytes from 172.16.83.3: icmp_seq=4 ttl=62 time=1.417 ms
64 bytes from 172.16.83.3: icmp_seq=5 ttl=62 time=1.159 ms
^C
--- 172.16.83.3 ping statistics ---
6 packets transmitted, 6 packets received, 0% packet loss
round-trip min/avg/max/stddev = 1.000/1.208/1.493/0.182 ms
The following table provides a summary of the commands and prompts discussed in this section.
| Command/Prompt | Description |
|---|---|
| {master} | Indicates you are in the master routing engine mode on a Juniper router. |
| > | Prompt for the operational mode. |
| username@router-name> | Structure preceding the > prompt. |
| ? | Universal help command |
| show version | Shows the version of the Juniper software running on the router, and it lists all the software suites installed on the router. |
| show configuration | Used to display the Juniper router current configuration. |
| re0 { and r1 { … | Identifies the system configuration for the routing engines 0 and 1. |
Router Configuration Mode
There are two types of interfaces for the Juniper routers: permanent and transient.
Two types of permanent interfaces exist:
- Management Ethernet Interface: This interface enables the router to establish both ssh and telnet connections.
- Internal Ethernet interface: This interface is the main communications link between the JUNOS software and the router’s packet forwarding engines.
Transient interfaces receive and transmit the data packets to and from the network. They are located on the physical interface card and can be inserted and removed at any time. These interfaces must be configured before they can be used.
The Juniper routers also have both a console and auxiliary serial port. The console port is used to establish a serial terminal connection and is used for the initial router configuration. The auxiliary port is used to connect to a modem and for remote access when there is a failure with the regular network connection.
Displaying the Router Interfaces
The command for displaying the router interfaces and their status is show interfaces brief. The following shows an example of using this command. Notice that the command is issued at the > operational mode prompt, and the {master} prompt indicates the Juniper router is equipped with two routing engines.
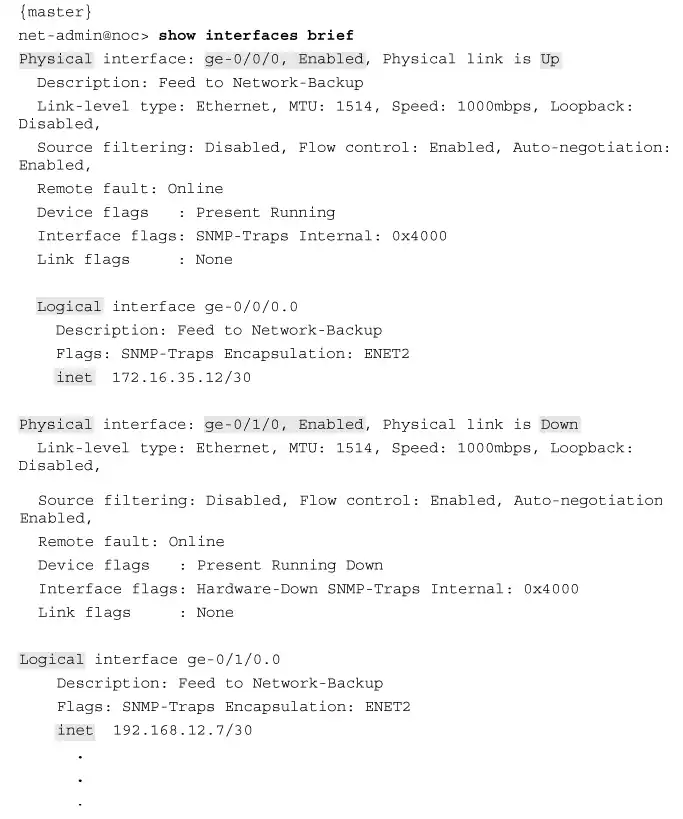
The ge-0/0/0 physical interface shows that it is enabled and the physical link is up. This indicates that the link can pass data packets. The ge-0/1/0 physical interface shows that it is down and the interface is disabled. This listing also shows logical interfaces for ge-0/0/0.0 and 0/1/0.0, which are defined by the IP addresses (inet) set for each interface. Notice that each of the two gigabit Ethernet interfaces (ge-0/1/0 and ge-0/0/0) has both a physical and a logical interface setting.
The ge-#/#/# notation for the physical interfaces is defined as follows:
- Media type: ge (gigabit Ethernet). Other options for media type are Sonet (so), ATM (at), FastEthernet(fxp)
- Slot number: 0
- Slot number on the interface: 0
- Port: 0
The notation for the logical interface lists the media type, slot number, slot number for the interface, and port. It also shows a description, the IP address, and the interface flags. Flags give information like the state or the status of the interface.
Hostname Configuration
The hostname on a Juniper router can be changed by entering the configuration mode. This can be done by entering the configure command, which places you in the [edit] mode. Notice that the prompt now has a # after it, indicating that you are in the configuration mode.
Next, enter edit system, which places you in the [edit system] mode. The hostname of the router is changed by entering the set host-name name command. The following is an example where the hostname of the router is changed from noc to Juniper.
(Note: This change will not be implemented until the configuration is saved using the commit command.)
net-admin@noc> configure
[edit]
net-admin@noc>#edit system
[edit system]
net-admin@noc># set host-name Juniper
[edit system]
net-admin@noc>#commit
[edit system]
net-admin@Juniper>#
Assigning an IP Address to an Interface
The next example shows how an IP address is assigned to an interface. In this case, the interface is ge-0/0/0. The command configure places you in the edit mode. The ge-0/0/0 interface is specified by using the edit interfaces ge-0/0/0 command.
The prompt displays [edit interfaces ge-0/0/0] to indicate that you are configuring the ge-0/0/0 interface. The interface ge-0/0/0 is a physical interface. Next, the logical unit of the physical interface has to be configured. The logical unit 0 is chosen and the command edit unit 0 is entered.
The notation of the physical interface and the logical unit is ge-0/0/0.0, and this is referred to as logical interface. This is similar to Cisco’s way of creating a virtual subinterface. Once this is complete, the IP address can be configured using the set address command.
To configure the IP address, the family protocol will need to be specified. The family inet is a family protocol that supports all the IP traffic. Inet denotes the IP address in UNIX-based systems.
The prompt now changes to [edit interfaces ge-0/0/0 unit 0 family inet]:
net-admin@noc> configure
[edit]
net-admin@noc>#edit interfaces ge-0/0/0
[edit interfaces ge-0/0/0]
net-admin@noc>#edit unit 0
[edit interfaces ge-0/0/0 unit 0]
net-admin@noc>#edit family inet
[edit interfaces ge-0/0/0 unit 0 family inet]
net-admin@noc>#set address 192.168.1.1/24
[edit interfaces ge-0/0/0 unit 0 family inet]
net-admin@noc>#
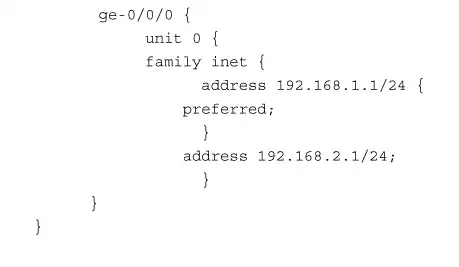
In Cisco routers, when the keyword secondary is used after the IP address statement, it signifies this is a secondary IP address. On a Juniper router, the same concept exists, but the configuration is done in reverse.
The primary IP address is specified with a keyword, but the secondary IP address is not. In this case, we can specify the IP address 192.168.1.1/24 as the primary by issuing the command set address 192.168.1.1/24 preferred, then configure the secondary IP addresses without the keyword preferred.
The following is the configuration of the primary IP address and secondary IP address on a Juniper router:
This section has demonstrated steps for hostname configuration and assigning an IP address to the interface. Although the command sequence is similar to Cisco routers, there are some distinct differences.
The following table provides a summary of the commands and prompts discussed in this section.
| username@router-name configure | Command used to enter the configuration mode |
|---|---|
| {master} [edit] | Places you in the [edit] mode |
| net-admin@noc> show interfaces brief | The command for displaying the router interfaces and their status |
| username@router-name># | The # indicates you are in the configuration mode |
| username@router-name>#edit system | Places you in the [edit system] mode |
| [edit system] net-admin@noc># set host-name Juniper | Sets the hostname of the router to Juniper |
| [edit system] net-admin@noc>#commit | Command used to save changes |
References
To learn more about this topic, check the book “A Practical Guide to Advanced Networking” by Jeffrey S. Beasley and Piyasat Nilkaew on Amazon.
Juniper has an entire portal dedicated to teaching about computer networks with particular emphasis on its products and its operating system. Visit Juniper Learning Portal.
You can also visit Amazon’s Juniper Store where you can find the latest Juniper products.