Welcome to a new venture in your Python programming journey! Whether you’re a computer science student, a coding enthusiast, or even an absolute beginner, this article will serve as your roadmap to developing a simple yet powerful Python project—MiniPass.
The goal of this article is two-fold. First, to introduce you to the simplicity and utility of Python programming through a practical application. And second, to give you a glimpse into how Python can aid in cybersecurity, by helping you create a secure password generator with just a few lines of code. Ready to embark on this journey? Let’s dive in!
Jump to:
- Introduction
- Why Python?
- Setting up the Environment
- Step-by-Step Guide to Building MiniPass
- Code Walkthrough
- Extending MiniPass
- Conclusion
- Additional Resources
Introduction
Welcome to a groundbreaking step in your journey toward mastering Python! Python is not just another programming language; it’s a versatile tool with applications spanning from web development to artificial intelligence and, as you’ll soon discover, even cybersecurity. In this article, we’re diving into a project so straightforward yet so useful that it’ll compel you to consider Python as your go-to programming language.
Meet MiniPass—your pocket-sized Python password generator.
In a world where data breaches are commonplace, the value of a secure password cannot be overstated. That’s where MiniPass comes in. With fewer than 30 lines of Python code, you’ll construct a robust password generator capable of creating secure, randomized passwords. Not only will this bolster your coding skills, but it’ll also provide a practical tool that you can use in your everyday digital life.
Our goals are straightforward. We aim to:
- Introduce you to the exceptional ease and utility of Python programming through the development of MiniPass.
- Equip you with the foundational knowledge necessary to understand how Python can play a role in cybersecurity solutions.
So, are you ready to embark on this programming escapade? Let’s get started!
Why Python?
You may be wondering, “Why choose Python?” Excellent question! The answer lies in the three Vs that define Python: Versatility, Viability, and Vibrant community support.
Ease of Learning
First and foremost, Python is incredibly beginner-friendly. Its syntax is clear, readable, and intuitive, making it an excellent choice for those new to programming. This language was designed with the human brain in mind, reducing the cognitive load and making coding a more enjoyable experience.
Versatility and Applications
Python is not a one-trick pony. Its applications are as vast as your imagination—from web and mobile app development to data analysis, machine learning, and artificial intelligence. And let’s not forget cybersecurity! Python’s extensive standard library and the plethora of third-party packages make it an ideal choice for virtually any project you can think of.
Large Community Support
Having a problem? Chances are, someone else has had it too—and solved it. Python’s vibrant community is one of its most compelling assets. Whether you’re a beginner looking for tutorials or an expert seeking to collaborate on groundbreaking projects, Python’s community is an invaluable resource. There are forums, webinars, online courses, and a multitude of open-source projects that you can contribute to, enhancing both your skills and your network.
In summary, Python offers a harmonious blend of simplicity and power, making it an excellent choice for coding aficionados at all levels. Its wide range of applications, coupled with robust community support, makes Python a programming language that you can’t afford to ignore.
Setting up the Environment
Before we dive into the nitty-gritty of crafting our MiniPass password generator, it’s crucial to have the right tools in place. Setting up a solid development environment is akin to a chef organizing their kitchen; it paves the way for a smoother, more efficient coding experience. In this section, we’ll walk you through the key steps to ensure your system is ready for Python development.
Installing Python
The first order of business is installing Python itself. Head over to the official Python website and download the latest stable version that’s compatible with your operating system. The installation process is typically straightforward, but if you encounter any hiccups, the Python community has a plethora of tutorials and guides to help you out.
IDE Recommendations
Next, let’s talk about Integrated Development Environments (IDEs). While you can certainly code in a basic text editor, an IDE offers numerous advantages, including code completion, debugging tools, and integrated terminal access, among others. Here are some recommendations based on your proficiency level:
- Beginners: Thonny is a fantastic choice. It comes with Python built-in and focuses on helping newcomers learn Python and understand its intricacies.
- Intermediate Users: PyCharm offers a stellar balance of functionality and usability, perfect for those with some Python experience.
- Advanced Users: Visual Studio Code (VSCode) is highly customizable and ideal for those who need a versatile tool capable of handling more than just Python development.
Virtual Environments
It’s often a good idea to isolate your Python projects to prevent dependency conflicts. This is where virtual environments come into play. To set one up, simply open your terminal and run the following commands:
- Install ‘virtualenv‘ if you haven’t already:
pip install virtualenv
- Create a new virtual environment:
virtualenv my_project_env
- Activate the virtual environment:
- Windows:
.\my_project_env\Scripts\activate - macOS/Linux:
source my_project_env/bin/activate
- Windows:
Verifying Your Setup
Last but not least, let’s ensure everything is in working order. Open your terminal, type python or python3 (depending on your installation), and hit enter. If you see the Python interactive shell, congrats! You’re all set to begin your journey with MiniPass.
In just a few simple steps, you’ve set up a robust Python development environment. You’re not just prepared for this project; you’ve laid the foundation for countless Python projects to come. So pat yourself on the back, and let’s move on to the exciting part—building MiniPass!
Step-by-Step Guide to Building MiniPass
Now that we have our development environment finely tuned, it’s time to shift gears and start building MiniPass. Rest assured, this project is beginner-friendly but packs enough punch to make even seasoned coders nod in approval. Without further ado, let’s get coding!
Project Requirements
Libraries to be Used
For MiniPass, the Python Standard Library has everything we need, particularly the random and string libraries. No need for external dependencies—another testament to Python’s robustness.
Knowledge Prerequisites
A basic understanding of Python syntax and functions will suffice. If you’re new to Python, not to worry; the following guide will break things down into digestible pieces.
Coding the Project
Here is the complete code for the MiniPass project, followed by a detailed walkthrough.
1. Importing Necessary Libraries
Start by importing random and string. The random library helps us randomize our password characters, while string contains predefined character sets we’ll use.
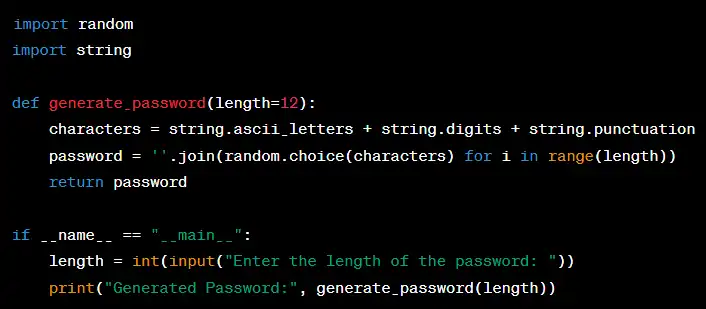
import random
import string
2. Understanding Randomization
Randomization is the core of our password generator. The random.choice() function will pick a character at random from a given list of characters.
3. Generating Passwords
We define a function generate_password(), which combines alphabets, digits, and punctuation marks, then picks characters randomly to generate a password.
def generate_password(length=12):
    characters = string.ascii_letters + string.digits + string.punctuation
    password = ''.join(random.choice(characters) for i in range(length))
    return password
4. Customizing Password Parameters
The function takes an optional length parameter to allow password length customization. By default, it’s set to 12 characters for optimal security and usability.
5. Storing the Passwords (Optional)
The current code just prints the password. For future iterations, consider storing generated passwords in an encrypted file or a database.
Execution
Wrap the function call under the __main__ block. This way, when you run the script, it asks for a password length and then generates the password.
if __name__ == "__main__":
    length = int(input("Enter the length of the password: "))
    print("Generated Password:", generate_password(length))
And voilà! You’ve just built a pocket-sized Python-powered password generator. You’re not just a coder; you’re a craftsman shaping bytes and logic into useful tools.
There you have it—a step-by-step guide to building your very own Python password generator, MiniPass. With less than 30 lines of code, you’ve created something both educational and immensely practical. Stay tuned as we delve deeper into the code in the next section!
Code Walkthrough
You’ve crafted your MiniPass password generator, but understanding the gears that make this machine whir is essential. So, let’s dissect the code line-by-line and unravel the magic behind MiniPass.
Import Statements
import random
import string
Here, we import Python’s built-in random and string libraries. random gives us the ability to randomize selections, while string provides various string constants, like alphabets and punctuations, ready for our use.
The generate_password Function
def generate_password(length=12):
We define a function called generate_password and set its default parameter length to 12. This way, even if a length isn’t provided, the function will generate a 12-character password.
Character Set
characters = string.ascii_letters + string.digits + string.punctuation
We concatenate alphabets, digits, and punctuations from the string library to create a pool of characters that our password generator will use.
Password Generation
password = ''.join(random.choice(characters) for i in range(length))
This line is where the magic happens. We use list comprehension and random.choice to select a character randomly for each position in the password. The join() method then combines these characters into a string, forming the password.
Return Statement
return password
Finally, our function returns the generated password.
Extending MiniPass
MiniPass is a functional password generator, but the sky’s the limit when it comes to adding features. Let’s explore some exciting avenues for extension.
Adding a User Interface
A command-line interface is neat, but how about jazzing it up with a graphical user interface (GUI)? Python’s Tkinter library could be your best friend here, providing an easy-to-use platform to build desktop applications.
Implementing Password Strength Meter
You can integrate a password strength meter using Python’s regex (re) library to evaluate the robustness of the generated password based on certain criteria like the mixture of uppercase, lowercase, digits, and special characters.
Secure Password Storage
If you want to store the generated passwords, consider using Python’s cryptography library to encrypt the passwords before saving them to a file or database.
Adding Two-Factor Authentication (Optional)
Adding two-factor authentication using Python’s smtplib for email verification can make your application even more secure.
Data Backup
To safeguard against data loss, integrate an automatic backup feature that saves the encrypted passwords to a secure cloud storage service.
Conclusion
By now, you’ve not only built your own Python-powered password generator, MiniPass, but also dissected its code to understand the underlying mechanics. That’s no small feat. This simple yet potent project serves as an embodiment of Python’s beauty—its ease of use, versatility, and immense power tucked behind just a few lines of code.
What’s more, the possibilities for extending MiniPass are truly endless. From implementing a GUI to adding advanced security features, you’re now equipped with the knowledge and inspiration to take this foundational project to new heights. So go ahead, unleash your creativity and code away!
Additional Resources
Hungry for more? Here are some resources to deepen your understanding and broaden your Python horizons:
- Python Documentation: The official Python documentation is your go-to source for in-depth knowledge and best practices.
- Real Python: Real Python offers tutorials and articles ranging from beginner to advanced levels.
- Automate the Boring Stuff with Python: This book offers practical Python projects that can automate tasks and solve real-world problems.
- Coursera Python for Everybody: A comprehensive course that covers Python basics and dives into web development and data manipulation.
- GitHub: Browse through Python projects on GitHub to see how others are using the language, and consider contributing to open-source projects to hone your skills.
- Stack Overflow: Got questions? Someone probably has the answer on Stack Overflow. Don’t hesitate to ask; the community is there to help!