When you connect a printer to your PC or add a new printer to your home network, you can usually start printing right away. Windows supports most printers, and you probably won’t have to go out of your way to install special printer software. If you’re using Windows 8.1 or Windows RT 8.1, additional printer support and drivers are available through Windows Update.

How to install a printer?
All you have to do to set up a printer is to connect it to your PC. Simply plug the USB cable from your printer into an available USB port on your PC, and turn the printer on.
To add a local printer
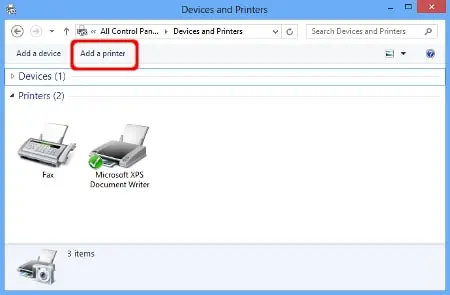
- Click the Start button, and then, on the Start menu, click Devices and Printers.
- Click Add a printer.
- In the Add Printer wizard, click Add a local printer.
- On the Choose a printer port page, make sure that the Use an existing port button and the recommended printer port are selected, and then click Next.
- On the Install the printer driver page, select the printer manufacturer and model, and then click Next.
- If your printer isn’t listed, click Windows Update, and then wait while Windows checks for additional drivers.
- If none are available and you have the installation CD, click Have Disk, and then browse to the folder where the printer driver is located. (For additional help, consult the printer manual.)
- Complete the additional steps in the wizard, and then click Finish.
To add a network, wireless, or Bluetooth printer
If you’re trying to add a network printer at the office, you’ll usually need the name of the printer. If you can’t find it, contact your network administrator.
- Click the Start button, and then, on the Start menu, click Devices and Printers.
- Click Add a printer.
- In the Add Printer wizard, click Add a network, wireless or Bluetooth printer.
- In the list of available printers, select the one you want to use, and then click Next. (If your computer is connected to a network, only printers listed in Active Directory for your domain are displayed in the list.)
- If prompted, install the printer driver on your computer by clicking Install driver. If you’re prompted for an administrator password or confirmation, type the password or provide confirmation.
- Complete the additional steps in the wizard, and then click Finish.
Print a test page
Available printers can include all printers on a network, such as Bluetooth and wireless printers or printers that are plugged into another computer and shared on the network. You might need permission to install some printers. You can confirm the printer is working by printing a test page.
Troubleshoot printer problems
- Make sure that the printer’s electrical cord is plugged into an electrical outlet and that the power switch is turned on. If you’re printing to a shared printer or a printer on a network, make sure that all necessary computers and routers are turned on too. If your printer or other equipment is plugged into a surge protector or a backup power supply, make sure that hardware is plugged in and turned on as well.
- If you’re using a wired printer, make sure that the printer cable is properly connected from the printer to your PC.
- For wireless printers, check the wireless connection. Make sure the printer’s wireless option is turned on and available. Many printers have a button that displays a blue wireless icon when wireless is available.
- Next, run the printer’s wireless connectivity test. Read the instructions that came with the printer or check the printer manufacturer’s website for instructions about how to do this.
- Use the printer troubleshooter
- Update drivers – Use Windows Update or Install software from the printer manufacturer.