Hey there! If you’re like most of us in the computer networking and technology realm, you know that being efficient and precise isn’t just nice—it’s essential. That’s where answer files come into play. They’re not just tools; they’re lifesavers for IT professionals like you and me. Imagine setting up Microsoft OS and other software without the hassle of manual installations. That’s the magic of answer files – they automate the whole process, making installations smooth, error-free, and, let’s be honest, a lot less tedious. In this guide, I’m going to walk you through everything about answer files. We’ll explore how they simplify installations, how to dodge those pesky manual errors, and how they can be your time-saving heroes. Ready to dive in and master these answer files together? Let’s get started!
In this article you’ll find:
- What is an Answer File?
- The Structure of an Answer File
- Creating an Answer File for Microsoft OS Installation
- Utilizing Answer Files for Software Automation
- Best Practices for Answer File Creation
- References

1. What is an Answer File?
Today, let’s talk about something that might just change how you approach installations: Answer Files. You’ve probably been through the drill of manually installing an OS, right? Clicking ‘Next’, filling in details, choosing settings – it’s a bit of a chore. Enter Answer Files – the real heroes in the world of automated or unattended installations.
So, what exactly are these Answer Files? Think of them as your personal installation assistants. These files are like detailed instruction manuals that tell your computer exactly how to install an OS or software – without you needing to be there to answer questions. They’re especially handy when you’re setting up multiple systems. Imagine the time and effort saved!
Answer Files are not just about convenience; they’re about precision and consistency. By pre-defining all the installation choices, you eliminate the chance of errors that can creep in with manual setups. Perfect for those environments where every second counts and every setup needs to be spot on.
2. The Structure of an Answer File
Alright, let’s dive deeper into the anatomy of an Answer File. If you’re picturing some complex, cryptic document, let me ease your mind – it’s actually pretty straightforward once you get the hang of it.
An Answer File is structured in XML format, which is a way of encoding documents in a format that’s both human-readable and machine-readable. This is great because it means you can understand what’s going on, and so can your computer.
The file is divided into several sections, each corresponding to a different phase of the installation. Here’s a quick overview:
- Windows PE: This is the Preinstallation Environment phase. Think of it as the setup before the setup. Here, you define basic settings like language, disk configuration, and network settings.
- Offline Servicing: This section is all about updates and drivers that need to be added to the installation image before the actual installation begins.
- Specialize: This phase is where things get personal. You can specify computer-specific settings like domain joining, network configurations, and more.
- OOBE (Out-of-Box Experience): This is the phase where user-specific settings are defined, like creating user accounts, setting up regional settings, and applying license keys.
Each of these sections contains specific commands and settings. For example, in the Windows PE section, you might see something like:
<component name="Microsoft-Windows-International-Core-WinPE" processorArchitecture="amd64" publicKeyToken="31bf3856ad364e35" language="neutral" versionScope="nonSxS" xmlns:wcm="http://schemas.microsoft.com/WMIConfig/2002/State" xmlns:xsi="http://www.w3.org/2001/XMLSchema-instance">
  <SetupUILanguage>
    <UILanguage>en-US</UILanguage>
  </SetupUILanguage>
  <InputLocale>en-US</InputLocale>
  <SystemLocale>en-US</SystemLocale>
  <UILanguage>en-US</UILanguage>
  <UILanguageFallback>en-US</UILanguageFallback>
  <UserLocale>en-US</UserLocale>
</component>
This snippet sets the language and locale settings for the installation. Every line and tag has a purpose, guiding the installation process step by step.
Creating an Answer File can seem like a daunting task, but once you understand its structure and the logic behind it, it’s like piecing together a puzzle – both challenging and satisfying. And the best part? Once you’ve set it up, you can use it as a template for future installations, saving you loads of time and ensuring consistency across setups.
In the next chapters, we’ll explore how to actually create these files and use them to automate installations. Stick with me, and you’ll be an Answer File pro in no time!
3. Creating an Answer File for Microsoft OS Installation
Hey again! Ready to roll up your sleeves and dive into creating an Answer File for a Microsoft OS installation? Let’s break it down into manageable steps, and I promise, by the end of this, you’ll be crafting these files like a pro!
1: Gather Your Tools
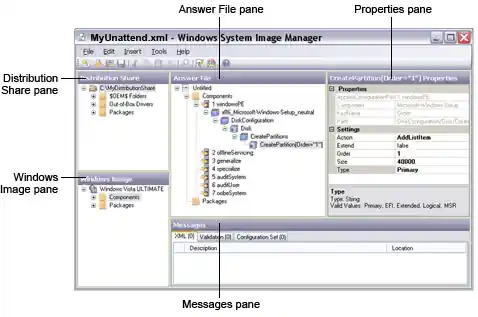
First things first, you’re going to need the Windows System Image Manager (Windows SIM). This handy tool is part of the Windows Assessment and Deployment Kit (ADK), which you can download from the Microsoft website. Windows SIM is the go-to tool for creating and managing Answer Files, so let’s get it on your machine!

2: Create a Catalog File
Once you have Windows SIM up and running, load a Windows image file (a .wim file, usually found in your Windows installation disk). This is the blueprint of your Windows installation. Windows SIM will use this to create a catalog file (.clg), which is essentially a map of all the settings and configurations you can control with your Answer File. Think of it as the index of a book, showing you where everything is.
3: Start Crafting Your Answer File
Now, onto the exciting part! In Windows SIM, go to the File menu and create a new Answer File. You’ll see a pane with all the possible settings, categorized into different phases of installation, like we discussed in the last chapter. This is where the catalog file comes in handy – it helps you navigate through these settings.
4: Fill in the Details
It’s time to start filling in the specifics. You’ll be adding settings to your Answer File by right-clicking and selecting ‘Add Setting to Pass’. Here’s where you define all those little details, like setting up the language, keyboard layout, time zone, product key, and more. It’s like telling your computer, “Hey, here’s exactly how I want you to set yourself up.”
5: Validate and Save
Once you’ve added all your settings, it’s crucial to validate your Answer File. This is like proofreading your work. Windows SIM has a validate feature that checks for any errors or missing information. After a successful validation, save your Answer File. It usually saves with a .xml extension.
6: Test It Out
Now, the moment of truth! Use your Answer File for an actual installation. You can do this by placing the file on a USB drive along with your installation media or using network-based installation techniques. During the Windows installation process, select your Answer File, and watch as your OS sets itself up, hands-free.
7: Tweaks and Adjustments
Chances are, you might not get everything perfect the first time, and that’s totally okay! The beauty of Answer Files is that they’re editable. If you notice something’s off, or you need to adjust settings for different installations, just head back to Windows SIM, make your changes, and validate again.
Wrapping It Up
Creating an Answer File can seem intimidating at first, but once you get the hang of it, it’s incredibly empowering. You’re essentially programming your installations, making them faster, more efficient, and uniform. Plus, it’s a skill that’ll earn you serious kudos in the IT world!
In our next chapter, we’ll dive into using Answer Files for automating software installations – another trick to add to your tech toolkit. Stay tuned, and happy automating!
4. Utilizing Answer Files for Software Automation
Alright, tech adventurers! We’ve tackled creating Answer Files for OS installations. Now, let’s shift gears and talk about using these files for automating software installations. This is where you’ll see the real magic of Answer Files in action, making your life as an IT pro much easier.

Embracing the Power of Automation
Imagine installing a suite of software across multiple machines without lifting a finger for each individual setup. That’s what we’re aiming for here. Answer Files aren’t just for operating systems; they can be crafted to automate the installation of various software packages too.
1: Identify Your Software
First up, identify the software you want to automate. It could be anything from office suites to specialized tools. Make sure you have the installation files ready, preferably in a network location accessible to all the machines you’re targeting.
2: Creating a Script
Here’s where things get a tad technical, but stick with me. You’ll need to create a script that will run the installation files. This script will reference your Answer File for configuration settings. You can write this script in PowerShell, batch scripting, or any other scripting language you’re comfortable with.
3: Integrating with Answer Files
Integrate your script with the OS installation Answer File, or have it run as a post-installation task. The key here is to ensure that the software installation kicks in automatically after the OS is set up. You can do this by adding a command in your OS Answer File that calls your software installation script.
4: Testing and Tweaking
As always, testing is crucial. Run a few trials to ensure that both the OS and the software are installed correctly. If something goes awry, tweak your script and Answer File until you hit that sweet spot of seamless automation.
5. Best Practices for Answer File Creation
Creating Answer Files is an art and, like any art, it comes with its own set of best practices. Here are some tips to help you master this craft:
Keep It Simple
Start with the basics. Don’t overcomplicate your Answer Files. Begin with essential configurations and gradually add more complexity as you become more comfortable.
Comment Your Files
Remember, you might not be the only one reading these files. Use comments liberally to explain what each section of your Answer File does. This is especially helpful when you revisit the file after some time or when you’re working in a team.
Consistent Naming Conventions
Be consistent with your naming conventions. This makes it easier to understand and maintain your Answer Files, especially when dealing with multiple files across different installations.
Validate, Then Validate Some More
Always validate your Answer Files after making changes. This catches errors and saves you from headaches during actual installations.
Keep Up with Updates
Software and OS updates might require changes in your Answer Files. Keep them updated to ensure compatibility and to take advantage of new features or settings.
Security First
When setting up configurations, always keep security in mind. Ensure that your Answer Files don’t expose sensitive information or create security vulnerabilities.
Document and Backup
Document the process of creating and using your Answer Files. Also, keep backups of these files. You never know when you might need to revert to an earlier version.
Practice Makes Perfect
Finally, practice! The more you work with Answer Files, the more proficient you’ll become. Experiment, learn from mistakes, and keep refining your skills.
6. References
- “Windows System Image Manager Technical Reference“, Microsoft Learn
- “Automating Microsoft Windows Server 2008 R2 with Windows PowerShell 2.0” by Matthew Hester and Sarah Dutkiewicz – Covers automation techniques including the use of scripts in conjunction with Answer Files.
- “Windows 7 Resource Kit” by Mitch Tulloch, Tony Northrup, Jerry Honeycutt – Provides insights into Windows installations and automations.
- “Mastering Windows Server 2016” by Jordan Krause – Although focused on Server 2016, this book provides a broader understanding of Windows environments and automation practices.