From the very beginning, things need to run smoothly, and that’s precisely where the ‘computer boot sequence’ comes into play. This critical process involves an array of system and memory checks initiated at the computer’s startup, laying the groundwork for a robust and reliable system operation.
In this article, we’ll dissect the boot sequence with precision, casting light on the nuances that distinguish the boot processes between the leading operating systems—Windows and Linux. Moreover, we’ll delve into the intricacies of boot configuration options, and equip you with the technical acumen to troubleshoot the most prevalent boot-related issues. Join us on this sequential journey!
Table of Contents:
- What is the Computer Boot Sequence?
- Understanding BIOS and UEFI
- The Boot Sequence Process
- Boot Files and Their Functions
- Configuring Boot Options
- Troubleshooting Boot Issues
- Windows and Linux Boot Sequence Detailed
- References

1. What is the Computer Boot Sequence?
The computer boot sequence is like the morning routine your computer goes through every time you turn it on. Just as you wouldn’t sprint out the door without brushing your teeth, your computer doesn’t jump straight to letting you play games or write a term paper. Instead, it starts with a Power-On Self-Test (POST), where it checks its hardware to make sure everything’s in place: memory is intact, the keyboard is ready, and the screen is functioning. This is the BIOS (Basic Input/Output System) at work on older systems, or UEFI (Unified Extensible Firmware Interface) on newer ones, which is like an upgraded, faster version of BIOS with better security and more features. If the POST goes well, the BIOS/UEFI hands off control to the operating system.
Think of the operating system as the brain of your computer, and the BIOS/UEFI is like the alarm clock that wakes it up. Once the BIOS/UEFI finds the operating system through a set order of storage places—like checking the closet (hard drive) or the drawers (removable media) for your favorite shirt (the OS)—it starts loading it so you can start your day, or in this case, your work or play on the computer. Whether it’s Windows or Linux, the operating system begins to load its essential files into memory, setting up a workspace so all the programs you want to use have a place to run efficiently and securely. This sequence is meticulously engineered to ensure that by the time you see your desktop or home screen, your computer is ready and capable to tackle whatever task you throw at it.
2. Understanding BIOS and UEFI
Before your computer can leap into action, it must converse with its BIOS (Basic Input/Output System) or UEFI (Unified Extensible Firmware Interface). These systems are the unsung heroes of the boot sequence, orchestrating a harmony of hardware checks and system balances before the operating system takes the stage. BIOS, the legacy system, conducts a Power-On Self-Test (POST), ensuring each hardware component is functioning correctly before seeking out the storage device that holds the operating system. UEFI, the modern successor of BIOS, enhances this process with speed and added security measures, including protection against malware during boot-up. The transition from BIOS to UEFI wasn’t just a step; it was a leap toward a more secure, swift, and smooth booting experience. UEFI’s ability to store boot data in an easily accessible and modifiable environment—a feature absent in BIOS—allows for a more versatile pre-OS environment and faster boot and resume times.
3. The Boot Sequence Process
When power floods into a dormant computer, it triggers the BIOS or UEFI to wake from its slumber. Here’s what happens next:
BIOS Boot Sequence:
- POST: BIOS checks the health of your hardware.
- Bootloader: It then searches for the bootloader in the predefined boot device order.
- Operating System: The bootloader, found on something like your hard drive, hands over control to the operating system.
UEFI Boot Sequence:
- Initialization: UEFI runs its own diagnostics, far more elaborate than BIOS’ POST.
- Secure Boot: It verifies the operating system’s bootloader is signed with a recognized key, thwarting unauthorized bootloaders.
- EFI Executables: UEFI runs the EFI executables specified in its boot manager, a flexible system allowing multiple boot entries.
For Windows 10/11, UEFI will look for the EFI\Microsoft\Boot\bootmgfw.efi file to start Windows Boot Manager, leading to the familiar loading screen. Linux, when installed with UEFI, uses a bootloader such as GRUB, located at EFI\linux\grubx64.efi, to present you with a menu where you can choose to start Linux or another operating system.
Each step in these sequences is critical—like dominos in a line, one flaw, and the whole process can stumble, leaving a technician with the task of troubleshooting where and why the boot sequence broke down. Understanding these steps is crucial, not just for those moments when things go awry, but for appreciating the complex ballet of code and hardware that powers up our digital lives. Please read our article about the boot process.
4. Boot Files and Their Functions
The boot process of a computer system is akin to assembling a puzzle, where each piece, or boot file, must fit precisely with the others to create a complete picture that is the user’s operational environment. In Windows systems, this process begins with the BIOS or UEFI firmware identifying bootmgr (Windows Boot Manager) or bootmgfw.efi in UEFI systems, which then reads the BCD (Boot Configuration Data) store to understand the available boot options. Once the proper OS is selected, winload.exe is launched to initialize the Windows kernel.
Linux systems engage in a similar, yet distinct dance. They often use the GRUB (GRand Unified Bootloader) to read its configuration file, grub.cfg, located in the /boot/grub directory. This file directs GRUB on how to load the kernel and initial ramdisk image (initrd), which then transitions control to the Linux system.
These boot files are the choreographers of the boot sequence, dictating each step of the system’s awakening. They interact in a coordinated sequence, ensuring that the hardware is prepared, the kernel is properly loaded, and the user’s environment is precisely as they left it—ready for another day’s tasks.
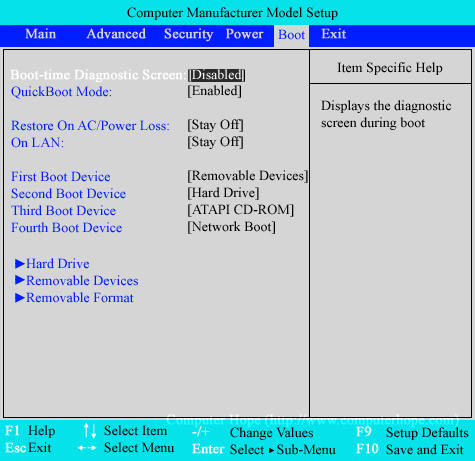
5. Configuring Boot Options
Navigating the BIOS or UEFI to configure boot options is like setting preferences for the starting players in a game—the order dictates which devices are checked first for a bootable operating system. Accessing these settings requires a key press (often Delete, F2, F10, or Esc) immediately after power-on. Within the BIOS or UEFI interface, users can sift through menus to find ‘Boot Options’ or ‘Boot Order’ and adjust the priority of devices, such as hard drives, USB drives, or DVD drives.
Altering the boot order becomes necessary in various scenarios. Perhaps there’s a need to boot from an installation media for a fresh OS install or to run a live system for troubleshooting without disturbing the primary storage. It may also be needed to prioritize a faster SSD over an older HDD, or to ensure that a dual-boot system checks for the correct bootloader. Changing boot sequence is like telling your computer, “Check here first for instructions,” and the BIOS/UEFI obliges, seeking out an OS where you’ve directed, providing a streamlined start-up aligned with the user’s immediate needs.
6. Troubleshooting Boot Issues
When the seamless boot sequence encounters turbulence, it’s akin to a conductor facing a suddenly discordant orchestra. Troubleshooting boot issues, therefore, requires a methodical approach to diagnosing and harmonizing the system’s components. Common boot sequence errors often manifest in messages like ‘No bootable device found,’ ‘Missing operating system,’ or an ominous string of beeps upon startup.
To strike the right chord in troubleshooting, start with these diagnostic tips:
- Listen and Observe: Error messages or beep codes can provide immediate clues. Refer to your motherboard’s manual for beep codes, as they can indicate specific hardware issues.
- Check Connections: Ensure all cables are connected firmly. A loose hard drive cable can lead to boot failures.
- Access BIOS/UEFI Settings: If the system bypasses your intended boot device, enter the BIOS/UEFI settings to verify the boot order.
- Boot in Safe Mode (Windows): If you suspect OS corruption, booting in Safe Mode may circumvent the issue, allowing you to perform repairs.
- Live USB/CD (Linux): A non-booting Linux system can often be addressed by booting from a Live USB, giving you the tools to repair the system.
Utilizing boot sequence information for resolution involves tracing the boot process step by step, isolating where the sequence halts. If the BIOS/UEFI doesn’t recognize storage devices, checking BIOS settings and physical connections is the first step. If the bootloader is the culprit, repairing it with recovery media or installation tools often gets the symphony back in tune.
7. Windows and Linux Boot Sequence Detailed
- Windows 10/11 Boot Sequence:
- Phase 0 – Pre-Boot: UEFI firmware checks hardware, security, and initializes system components.
- Phase 1 – Boot Loader: The Windows Boot Manager finds the Windows loader (winload.exe) for the chosen entry.
- Phase 2 – Kernel Loading: The Windows kernel is loaded and system drivers are initialized.
- Phase 3 – Logon: User logon screen is presented.
- Linux Boot Sequence (Using GRUB):
- Phase 0 – Pre-Boot: BIOS/UEFI performs POST and hands over to the bootloader.
- Phase 1 – Boot Loader: GRUB displays menu and loads the selected kernel image.
- Phase 2 – Kernel Phase: Kernel initializes the system and mounts the root file system.
- Phase 3 – Init/Systemd Phase: Init or systemd runs scripts/services leading to the login prompt.
8. References
- Books:
- “Operating Systems: Principles and Practice” by Thomas Anderson and Michael Dahlin
- “Guide to Parallel Operating Systems with Windows 10 and Linux” by Ron Carswell, Shen Jiang, and Terrill Freese
- RFCs and Publications:
- UEFI Specification (Release 2.10, Aug 29, 2022)
- “Booting process of Linux“, Wikipedia
- “Overview of Boot Options in Windows“, Microsoft Learn (Dec 12, 2023)
- “Secure the Windows Boot Process“, Microsoft Learn (Nov 8, 2023)
- “Secure Boot and Trusted Boot“, Microsoft Learn (Oct 10, 2023)