Imagine you’re at a party and you’ve brought a box of delicious treats. You could hold onto them all night, or you could set them out on the table for everyone to enjoy. In the world of Windows operating systems, that’s essentially what a “share” is—it’s about setting out your files and printers on the network table for others to access. In this article, we’ll explore the concept of Windows shares, how they work, and why they’re crucial for efficient digital collaboration across networks. Get ready to unlock the potential of your network with the power of sharing.
Index:
- What is a Windows Share?
- Creating a Windows Share
- Using Windows Shares
- Security Considerations
- Troubleshooting Common Issues
- Advanced Sharing Features
- Conclusion
- References
1. What is a Windows Share?
1.1. Definition and Basic Concept
At its core, a Windows Share (or shared resource) is a file, folder, or printer on one computer that is made accessible to others on the same network. Think of it as turning part of your computer into a public library, where selected books are available for anyone in the community to read. In technical terms, when you create a share on your computer, you are configuring it to allow other network users to view, access, and possibly edit files or use the printer as if they were directly connected to their own systems.
This sharing is facilitated through the Server Message Block (SMB) protocol, which is a communication protocol that allows systems within the same network to share resources. SMB works by defining a network file system and providing a way to establish a client-server interaction.
1.2. Types of Windows Shares
Windows supports several types of shares, catering to different needs and scenarios:
- File Shares: These are the most common types of shares where users can share entire folders with files such as documents, images, videos, etc. It’s like giving out copies of digital books from your virtual library.
- Printer Shares: Instead of connecting a printer to every computer in an office, you can connect it to one computer and share it. This way, anyone in the office can print documents through the shared connection.
- Administrative Shares: These are default shares intended for system administrators to access the drives of Windows machines remotely. They are typically hidden and accessed by appending a dollar sign ($) to the share name (e.g., C$).
In the next sections, we’ll delve into how you can set up your own shares, manage permissions to keep your data secure, and troubleshoot common issues that might arise. Whether for home use or within an enterprise, understanding how to effectively use Windows shares can significantly streamline how you interact with others in your network environment.
2. Creating a Windows Share
2.1. Step-by-Step Guide
Creating a Windows share is like setting up a stall at a community market where everyone can come and pick up what they need. Here’s how you can set up your stall:
- Select the Folder to Share: Navigate to the folder you wish to share. Right-click on the folder, then select ‘Properties’.
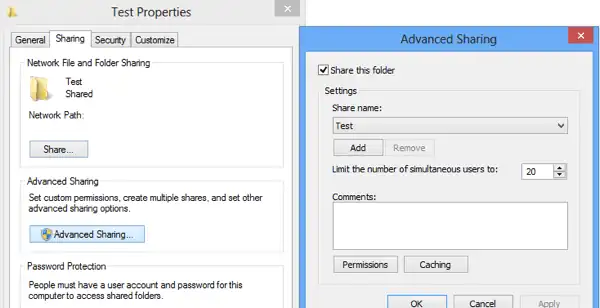
- Access the Sharing Tab: In the Properties window, click on the ‘Sharing’ tab. Now, click on ‘Advanced Sharing’.
- Enable Sharing: Check the box that says ‘Share this folder’. This action opens the door to your digital stall.
- Name Your Share: Under ‘Share name’, type a name for your share. This name is how others will see and refer to your shared folder on the network.
- Set User Limit: Decide how many users can access this folder at the same time. You can allow unlimited users or set a specific limit.
- Confirm and Close: Click ‘OK’ to close the Advanced Sharing window, then click ‘Close’ on the Properties window. Congratulations, your folder is now shared on the network!
2.2. Setting Permissions
Granting permission is like deciding who can browse through your stall and who can actually take something home. Here’s how to manage these permissions wisely:
- Open Advanced Sharing Again: Right-click on the shared folder, select ‘Properties’, go to the ‘Sharing’ tab, and click on ‘Advanced Sharing’.
- Permissions Button: Click the ‘Permissions’ button. This is where you set the rules for who can do what.
- Modify Permissions: You can add user groups or specific users and define their permissions:
- Read: Users can view and open files.
- Change: Users can modify, add, or delete files.
- Full Control: Users get complete control over the folder, including changing permissions.
- Apply and OK: After setting the desired permissions, click ‘Apply’ then ‘OK’ to ensure your settings are saved.
Remember, setting precise permissions is crucial for maintaining security and operational efficiency in your network.
See also: Share folders permission.
3. Using Windows Shares
3.1. Accessing Shared Resources
Accessing a shared resource on a Windows network is akin to visiting a friend’s house where you’re welcome to borrow books. Here’s how you can access these shared digital ‘books’:
- Open File Explorer: The simplest way is through File Explorer. Click on ‘Network’ in the left-hand pane, and wait for the network computers to appear.
- Directly Using the Run Dialog: Press
Win + Rto open the Run dialog, type\\computername\sharenameand then press Enter. Replace ‘computername’ with the actual name of the computer sharing the folder and ‘sharename’ with the name of the shared folder. - Using Network Discovery: Ensure network discovery is turned on to see other computers and their shared resources in your network.
3.2. Managing Connections
Managing your network connections ensures that your interaction with shared resources remains smooth and trouble-free. Here’s how to manage these connections:
- Monitoring Access: Regularly check who is accessing your shared resources. You can view this in the ‘Shared Folders’ section of Computer Management on the computer that hosts the share.
- Disconnecting Idle Sessions: To maintain security and efficiency, disconnect users who are idle. This can also be done from the ‘Sessions’ section in Computer Management.
- Using Group Policies for Management: For larger networks, especially in an enterprise environment, use Group Policies to manage how shares are accessed, who accesses them, and what auditing measures are in place to monitor usage.
By following these guidelines, you can effectively create, manage, and utilize Windows shares, enhancing collaboration and productivity within your network.
4. Security Considerations
4.1. Best Practices for Secure Sharing
When you share your digital resources, think of it as lending out keys to parts of your digital house. Here are some best practices to ensure you’re not just handing out these keys to anyone:
- Use Strong Passwords: Ensure that all network users have strong, unique passwords. This is like having a robust lock on your front door.
- Limit Permissions: Only give users the permissions they need to complete their tasks (read, write, modify). It’s like giving someone a key to the shed and not to your entire house.
- Regular Updates: Keep your systems and network devices updated. This helps patch up any security holes that could be exploited.
- Network Segmentation: Separate sensitive data onto different network segments. If one segment is compromised, the others remain secure.
- Use Encryption: If sensitive data is being transmitted, use encryption to protect it from eavesdroppers. Think of it as sending your mail in a locked box rather than an open envelope.
- Implement Access Logs and Monitoring: Keep an eye on who accesses what and when. This helps in identifying suspicious activity early.
4.2. Common Vulnerabilities
Even the best-kept digital fortresses can have their weak spots. Here are common vulnerabilities associated with Windows shares:
- Open Shares: Shares without proper permissions can be accessed by anyone on the network. This is like leaving your door unlocked.
- Lack of Encryption: Data transmitted without encryption can be intercepted by unauthorized parties.
- Outdated Software: Older systems may have unpatched vulnerabilities that attackers can exploit.
- Social Engineering: Users can be manipulated into granting access to unauthorized persons.
- Misconfigured Permissions: Incorrectly set permissions can allow unintended access to sensitive files.
5. Troubleshooting Common Issues
5.1. Connectivity Problems
If users are having trouble connecting to a share, consider these fixes as you would troubleshoot a faulty appliance:
- Check Network Connectivity: Ensure that all devices are properly connected to the network. It’s basic, but often it’s just the plug that’s loose.
- Verify Network Settings: Ensure that network discovery is enabled on all devices, and that they are on the same network or subnet.
- Firewall and Antivirus Checks: Sometimes, these can block network shares. Ensure your firewall or antivirus settings allow network sharing.
- Restart Devices: Turning it off and on again isn’t just a cliché—it often works to resolve network issues.
5.2. Permission Errors
When access is denied, it’s usually an issue with permissions. Here’s how to fix that:
- Verify User Permissions: Double-check that the user has the correct permissions to access the share. It’s like making sure everyone has the right key.
- Check Group Policies: In a business environment, group policies might restrict access. Make sure these policies are correctly configured.
- Ownership Issues: Sometimes, the problem is with file or folder ownership. Taking ownership or assigning the correct owner can resolve these issues.
- Propagate Permissions: If permissions are correct on a folder but not on its files, you might need to propagate permissions down to the files and subfolders.
By staying vigilant and methodical, you can navigate the complexities of Windows shares and maintain a secure and efficient network environment. Whether it’s locking down sensitive data or ensuring smooth connectivity, a proactive approach will save you from potential headaches down the line.
6. Advanced Sharing Features
6.1. Network Discovery Options
Network discovery is like the town crier of your network, announcing the presence of devices and resources available for sharing. Here’s how you can manage these announcements to your advantage:
- Turning on Network Discovery: This is generally done through the Network and Sharing Center. By enabling this setting, your computer can find other devices, and they can find you. It’s akin to opening your store for business and putting a sign out front.
- Configuring Discovery Options: Windows allows you to adjust settings such as file and printer sharing, public folder sharing, and media streaming. Each of these settings can be tailored to suit your network’s needs, much like setting up different sections of a store based on what customers might be looking for.
- Using Network Profiles: Windows categorizes network connections as Private, Public, or Domain. Each profile has default settings appropriate for the level of trust and sharing desired in that context. For instance, you might be more open in a Private network (home) than in a Public one (café).
6.2. Integrating with Active Directory
For organizations using Windows Server, integrating network shares with Active Directory (AD) can streamline access management like a master key system in a large hotel:
- Centralized Management: Active Directory allows you to manage user access to shared resources from a central location. This means you can assign permissions based on user roles or groups rather than individually.
- Access Control with Group Policies: AD group policies can enforce consistent security settings across all devices in the network. This is akin to having a security protocol that every department in a company follows.
- Scalability and Flexibility: As your organization grows, Active Directory makes it easy to scale up your sharing capabilities without losing control over who accesses what. It’s like being able to instantly issue or revoke key cards to rooms in a growing hotel complex.
See also: AAA Protocol.
7. Conclusion
Windows shares are the backbone of file and resource sharing in network environments, from small home networks to large enterprise systems. By understanding and utilizing the features and best practices outlined in this article, users can enhance their network’s functionality and security, ensuring that data not only flows freely but is also protected from unauthorized access. Just as a well-organized library benefits its patrons with easy access and secure knowledge, a well-managed network serves its users with efficiency and security.
8. References
Books
- “Networking All-in-One For Dummies” by Doug Lowe – A comprehensive guide covering all aspects of networking, including Windows sharing.
- “Windows Server Administration Fundamentals” by Crystal Panek (2019).
Online Resources
- “How to share files in File Explorer on Windows” – Support Microsoft.
- “File sharing over a network in Windows” – Support Microsoft.