Dynamic Host Configuration Protocol (DHCP) is a network protocol used to dynamically assign IP addresses and other network settings to devices on a local network. This comprehensive article aims to demystify DHCP, delving into its core components, mechanisms, and real-world applications to equip computer science students and professionals with essential knowledge.
In this article:
Part I: Introduction to Concepts Related to DHCP
- Introduction to Network Protocols
- The Need for DHCP in Modern Networks
- How DHCP Fits into the OSI Model
- IP Address, Subnet Mask, and Gateway
- DHCP vs. Static IP Addresses
- Components of DHCP
- Lease Time and Renewal
Part II: How DHCP Works – A Comprehensive Guide
- The Four-Step DHCP Process
- DHCP Options
- DHCP Discover Mechanism
- DHCP Offer Mechanism
- DHCP Request and Acknowledgment
- DHCP Renewal Process
- Failover and Redundancy
- Security Concerns and Mitigations
Part III: Practical Examples and Use-Cases
- Configuring a DHCP Server on Windows
- Configuring a DHCP Server on Linux
- DHCP Troubleshooting
- Use-Case-DHCP-in-a-Home-Network
- Use-Case: DHCP in Enterprise Networks
- Advanced DHCP Features
Part IV: Extra Content
Part I: Introduction to Concepts Related to DHCP
1. Introduction to Network Protocols
Network protocols are a set of rules and conventions that govern the interaction between computers and other devices in a network. Think of them as the “language” devices speak to transmit data efficiently and securely. They dictate how information is packaged, sent, received, and interpreted. These rules are essential for maintaining order, ensuring that data gets to its intended destination without errors, and enabling disparate devices to communicate seamlessly.
In today’s interconnected world, network protocols are the backbone of any data exchange over the Internet, whether it’s a simple email or a complex cloud-based application. Without standardized protocols, we would face a Tower of Babel in networking, making it near-impossible for different systems to understand each other. From HTTP for web browsing to SMTP for email, protocols are indispensable in ensuring smooth data transfer and, by extension, the functioning of modern society.
2. The Need for DHCP in Modern Networks
In the early days of networking, IP addresses were often assigned manually in a process known as static allocation. Administrators had to individually configure each device, a cumbersome and error-prone task. Imagine having to manually assign addresses for each device in a large organization; not only is this labor-intensive, but it also increases the risk of misconfiguration and IP conflicts. Furthermore, tracking which IP addresses have been allocated and which are available becomes a logistical nightmare as networks grow.
Enter DHCP, or Dynamic Host Configuration Protocol. DHCP automates this IP assignment, thus simplifying network management exponentially. When a device joins a network, the DHCP server automatically assigns it an IP address from a pool of available addresses, along with other network configurations like the subnet mask and default gateway. This is not just convenient; it’s also more efficient, reducing the chances of IP conflicts and freeing up valuable administrative time for other tasks.
The DHCP server also ‘leases’ these IP addresses for a set period, reclaiming them when they’re not in use. This dynamic nature makes DHCP highly scalable, allowing for easy addition or removal of devices without manual reconfiguration. In essence, DHCP not only streamlines network management but also paves the way for network expansion and adaptability, characteristics intrinsic to modern networks.
3. How DHCP Fits into the OSI Model
Understanding where DHCP stands in the OSI (Open Systems Interconnection) model provides valuable context for its role in networking. The OSI model serves as a framework for understanding how different networking protocols interact and operate. It is divided into seven layers, starting from the Physical layer at the bottom to the Application layer at the top.
DHCP primarily operates at the Application layer, the seventh layer of the OSI model. However, its functionality has implications that cascade down to the Network layer, where IP addresses operate. While the Application layer is responsible for network services to end-user applications, the Network layer deals with routing and forwarding packets across the network.
The importance of DHCP operating at the Application layer lies in its ability to facilitate higher-level application tasks while influencing lower-layer functions, like IP address allocation. By interacting with both user applications and the core network infrastructure, DHCP serves as a bridge, uniting various elements of network management into a cohesive system. This multi-layer operation is crucial for the protocol’s versatility and its broad range of features beyond just IP address allocation.
4. IP Address, Subnet Mask, and Gateway
Understanding DHCP inevitably involves a grasp of three key components: IP Address, Subnet Mask, and Gateway. Let’s delve into each:
- IP Address: This is the unique identifier for each device on a network. Think of it like a home address but for your computer or smartphone. IP addresses enable devices to locate each other and communicate effectively.
- Subnet Mask: A subnet mask works alongside an IP address to identify which part of the address designates the network and which part designates the device. By separating the network ID from the host ID, subnet masks enable efficient routing within a local network and facilitate communication between multiple subnets within a larger network.
- Gateway: The gateway serves as the intermediary device that connects your local network to external networks, most commonly the Internet. When a device needs to communicate with another network, it sends the data to the gateway, which then routes it to the appropriate destination.
Together, these components play vital roles in a network, forming the backbone of how devices communicate and interact. DHCP automates the configuration of these settings, allowing devices to connect to a network and communicate with each other effortlessly. By dynamically assigning these configurations, DHCP ensures optimal network performance and simplifies the task of network management.
5. DHCP vs. Static IP Addresses
When it comes to IP address allocation, there are essentially two methodologies—Dynamic Host Configuration Protocol (DHCP) and Static IP addresses. Both have their merits, but they serve different needs and scenarios.
DHCP:
- Dynamic Allocation: DHCP assigns IP addresses dynamically, meaning devices could have a different IP address each time they connect to the network.
- Efficiency: DHCP is easier to manage, especially in large networks where devices frequently join or leave.
- Scalability: Ideal for environments where devices are constantly changing, as new addresses can be automatically allocated and old ones recycled.
- Risk Mitigation: Reduced risk of IP address conflicts and errors as everything is managed by the DHCP server.
Static IP Addresses:
- Permanent Allocation: A device keeps the same IP address until manually changed, providing a predictable and consistent identifier.
- Resource Intensive: Requires manual configuration and meticulous record-keeping, making it labor-intensive.
- Precision Control: Suited for network devices that need a fixed IP for specific tasks or permissions.
- Stability: Once set, there’s no risk of the address changing, which is vital for some server tasks and network configurations.
Comparative Takeaways:
- DHCP is excellent for most standard network configurations due to its automatic management features.
- Static IPs are preferable for devices that require constant, unchanging access, such as servers or dedicated workstations.
Understanding the strengths and limitations of DHCP and static IPs enables network administrators to make educated decisions on how to best allocate network resources.
6. Components of DHCP
DHCP operates through a client-server model, involving several key components that work in unison to enable dynamic IP address allocation. Understanding these components is crucial for anyone wanting to grasp the intricacies of DHCP.
- DHCP Server: This is the heart of the DHCP operation. The server stores the range of IP addresses to be allocated, known as the address pool, and other network settings. When a client requests an IP address, the server selects one from its pool and offers it to the client.
- DHCP Client: Any device that connects to a DHCP-enabled network acts as a DHCP client. The client requests network settings from the DHCP server, accepts the offer, and configures itself based on the received information.
- DHCP Relay Agent: In larger, segmented networks, a DHCP relay agent helps transmit messages between DHCP clients and servers that don’t reside on the same physical subnet. The relay agent forwards client requests to the server and returns the server’s responses back to the client.
Each of these components plays a vital role in the DHCP ecosystem. Together, they automate the network configuration process, making it easier, faster, and more efficient for both administrators and end-users.
7. Lease Time and Renewal
Lease time is a crucial aspect of DHCP that often goes overlooked, yet it is fundamental to understanding how DHCP maintains efficient network management. In simple terms, lease time is the duration for which an IP address is “rented out” to a DHCP client by the DHCP server. It’s a timer that starts ticking the moment the IP address is assigned. Lease times can vary, ranging from as short as a few minutes to as long as several days, depending on the network’s requirements and the administrator’s preferences.
Why is Lease Time Important?
- Resource Management: Limited IP addresses can be effectively reused, ensuring optimal resource utilization.
- Dynamic Adaptation: It allows for more effortless network reconfiguration, as IP addresses are not permanently tied to clients.
- Network Integrity: Lease time minimizes the risk of IP address conflicts since addresses are periodically returned and reassigned.
The Renewal Process
IP address renewal is the mechanism by which an active DHCP lease is extended. Here’s how it typically works:
- Halfway Through: Once the lease time reaches its halfway point, the DHCP client initiates a renewal request, commonly sent directly to the DHCP server that initially granted the lease.
- Server Response: Upon receiving the renewal request, the DHCP server may extend the lease, allowing the client to keep its current IP address for another lease period.
- Failure to Renew: If the client fails to renew its lease, either because the server is down or the client has moved to a different network, the DHCP client will attempt to renew its lease with any available DHCP server when 87.5% of the lease time has expired.
- Lease Expiry: If the client still fails to renew the lease after reaching the end of the allocated lease time, it must discontinue using the IP address and initiate the DHCP process anew to obtain a new address.
Understanding lease time and the renewal process helps to illustrate the self-sustaining and automated nature of DHCP, features that make it an invaluable tool in modern network management.
Part II: How DHCP Works – A Comprehensive Guide
8. The Four-Step DHCP Process
One of the most fundamental aspects of the Dynamic Host Configuration Protocol is the Four-Step DHCP Process, commonly known by its acronym, DORA, which stands for Discovery, Offer, Request, and Acknowledgment. Understanding these four stages is crucial for anyone delving into DHCP, whether you’re a student, an IT professional, or a network administrator.
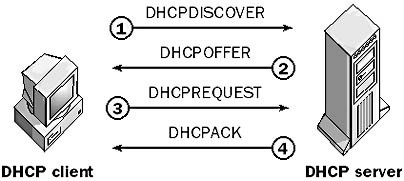
- Discovery: The process starts with the DHCP client sending out a broadcast message—known as a DHCPDISCOVER message—to identify any available DHCP servers on the network.
- Offer: Upon receiving the DHCPDISCOVER message, the DHCP server sends back a DHCPOFFER message, offering an IP address and additional network settings to the client. If multiple servers send offers, the client generally accepts the first one it receives.
- Request: The client responds by broadcasting a DHCPREQUEST message to indicate its acceptance of the offered IP address. This step serves as a confirmation and informs other DHCP servers that their offers are declined.
- Acknowledgment: Finally, the DHCP server sends a DHCPACK message, confirming that the IP address has been officially allocated to the client. The server also provides additional network configuration details, setting the stage for successful network communication.
This DORA process automates IP address allocation, making network configuration both efficient and error-free.
9. DHCP Options
DHCP is not just about IP address allocation; it also provides a variety of options that allow for more complex and customized network configurations. These “DHCP Options” are a set of pre-defined, standardized settings that the DHCP server can send to the client along with the IP address.
Some commonly used DHCP options include:
- Option 3: Router (Default Gateway)
- Option 6: DNS Servers
- Option 15: Domain Name
- Option 42: NTP Servers
Why Are DHCP Options Important?
- Customization: DHCP options enable network administrators to offer specific configurations tailored to meet the individual needs of each client or network.
- Simplified Management: By including various settings in the DHCP offer, administrators can control multiple aspects of network behavior without requiring manual configuration on each client.
- Network Services: Some DHCP options can point clients to additional network services, such as VoIP servers or proxy configurations, thereby extending the protocol’s capabilities beyond mere IP address assignment.
Understanding DHCP options is essential for anyone looking to unlock the full potential of DHCP in complex, multi-faceted network environments.
» Read next: How to implement DHCP Option 82 for security?
10. Dynamic Host Configuration Protocol Discover Mechanism
The DHCP Discover mechanism is the initial stage in the four-step DHCP process known as DORA (Discovery, Offer, Request, Acknowledgment). In this phase, a client that joins a network and needs an IP address to participate in it actively seeks out a DHCP server. Here’s how it works:
Steps of the Discover Mechanism:
- Initialization: When a DHCP client connects to a network, it broadcasts a DHCPDISCOVER message. This is a general broadcast, as the client is unaware of any DHCP servers on the network.
- Packet Details: The DHCPDISCOVER packet usually contains the client’s MAC address and may contain the desired IP address, although the latter is optional.
- Broadcast Domain: The message is broadcast across the local network domain. If the network has multiple subnets, a DHCP Relay Agent can forward the DHCPDISCOVER message to other subnets.
- Waiting for Response: After broadcasting the DHCPDISCOVER message, the client waits for a DHCPOFFER message from a DHCP server.
Significance:
- Network Efficiency: The DHCP Discover mechanism ensures that IP addresses are only assigned to clients that require them, optimizing network resource utilization.
- Automated Configuration: This automated process negates the need for manual IP address configuration, simplifying the network setup process.
11. DHCP Offer Mechanism
Following the Discovery phase, the next critical step is the DHCP Offer mechanism. This is where the DHCP server offers an IP address to the client based on the range of available addresses in its pool. Let’s break it down:
Steps of the Offer Mechanism:
- Receiving Discovery: The DHCP server receives the DHCPDISCOVER broadcast message from the client.
- IP Address Allocation: The server selects an available IP address from its pool and temporarily reserves it for the client.
- Forming the Offer: The server then constructs a DHCPOFFER message containing the selected IP address and additional network settings.
- Sending the Offer: The server broadcasts the DHCPOFFER message back to the client. If multiple DHCP servers are available, the client may receive multiple offers but generally accepts the first one it gets.
Significance:
- Automated Management: The DHCP Offer mechanism allows the server to manage its IP address pool efficiently, reducing the risk of conflicts and duplication.
- Flexible Configuration: The server can also include other network settings, like the default gateway and DNS server addresses, streamlining the client’s network setup.
By understanding these individual mechanisms within the broader DORA process, you’ll gain a richer insight into how DHCP works and why it’s an invaluable tool for modern networks.
12. DHCP Request and Acknowledgment
After receiving one or more offers from DHCP servers in the network, the client enters the Request and Acknowledgment phases to complete the DORA process.
Request Phase:
- Accepting the Offer: The client chooses one offer (generally the first it receives) and broadcasts a DHCPREQUEST message to notify all servers about the accepted offer.
- Multiple Offers: In case of multiple offers, this broadcast ensures that only the chosen server finalizes the IP assignment while informing the other servers to withdraw their offers.
- Final Confirmation: The DHCPREQUEST message serves as the client’s formal acceptance and is also the final check to ensure that the IP address is still valid and has not been allocated elsewhere in the interim.
Acknowledgment Phase:
- Finalizing Assignment: The chosen DHCP server responds with a DHCPACK message, confirming the assignment and providing additional network configuration information.
- Completing the Handshake: Upon receiving the DHCPACK, the client completes its network configuration and becomes an active participant in the network.
- Nack Response: If the server finds that the IP is no longer available or if the request is invalid, it sends a DHCPNACK, forcing the client to restart the DORA process.
By clearly understanding the Request and Acknowledgment steps, you complete the full circle of how DHCP dynamically manages IP addresses within a network.
13. DHCP Renewal Process
Lease renewal is an integral part of DHCP that ensures IP addresses are efficiently managed and allocated over time. Here’s how it operates:
- T1 Timer: When the lease time reaches its halfway point (T1 timer), the client attempts to renew the lease by sending a DHCPREQUEST directly to the server that initially granted the IP address.
- Server Response: If the server approves the renewal, it sends back a DHCPACK with a new lease time, effectively renewing the client’s lease.
- T2 Timer: If the T1 timer expires and the lease is not renewed, a second timer (T2) starts, during which the client broadcasts a DHCPREQUEST to any available server for a new lease.
- Lease Expiration: If the client fails to renew its lease before it fully expires, it must release its current IP address and start the DORA process anew to acquire a new IP address.
The renewal process underscores DHCP’s dynamic nature, allowing for ongoing network changes while maintaining stable operations.
14. Failover and Redundancy
In a production environment, relying on a single DHCP server is a recipe for disaster. Network uptime is crucial, and a single point of failure is unacceptable. Hence, DHCP servers are often configured to be redundant to avoid failure.
DHCP Failover:
- Active-Active: In an active-active configuration, two or more DHCP servers share responsibility for a subnet. Each server can respond to any client request, offering high availability and load balancing.
- Active-Passive: One server actively handles DHCP requests while the other is on standby, ready to take over if the active server fails.
Load Balancing:
- Multiple Dynamic Host Configuration Protocol servers can be configured to share the load of client requests, enhancing performance and reliability.
Significance:
- High Availability: Redundant DHCP servers ensure there’s no downtime in IP address allocation, which is critical for maintaining network operations.
- Scalability: As the network grows, additional DHCP servers can be added seamlessly to share the load.
By implementing failover and redundancy, network administrators can ensure that DHCP services are always available, even when individual servers fail.
15. Security Concerns and Mitigations
Like any network protocol, Dynamic Host Configuration Protocol is not without its security risks. However, understanding these risks is the first step in mitigating them effectively.
Risks:
- Rogue DHCP Servers: Unauthorized DHCP servers can be set up to provide incorrect configurations, leading to potential security breaches.
- DHCP Snooping Attacks: Attackers can snoop on DHCP traffic to gather information like IP addresses and MAC addresses for malicious purposes.
Mitigations:
- DHCP Snooping: Network switches can be configured to filter and control DHCP traffic, permitting only authorized servers to operate.
- IP-MAC Binding: Binding specific IP addresses to known MAC addresses can prevent unauthorized devices from obtaining network access.
- Network Segmentation: Limiting DHCP traffic to specific VLANs can contain the potential impact of rogue DHCP servers.
- Regular Audits: Consistent monitoring and logging can help in the early detection of unauthorized DHCP activity, allowing for immediate corrective action.
Understanding and addressing these security concerns are essential for maintaining the integrity and reliability of Dynamic Host Configuration Protocol operations within a network.
Part III: Practical Examples and Use-Cases
16. Configuring a DHCP Server on Windows
For those who prefer learning by doing, this comprehensive guide will walk you through the process of setting up a DHCP server on a Windows machine. Whether you’re setting this up in a lab for educational purposes or deploying it in a production environment, the following steps should provide you with a smooth experience.
Prerequisites:
- Windows Server OS (2012, 2016, 2019, etc.)
- Administrative access to the server
- Basic understanding of network configurations
Step 1: Open Server Manager
- Log in to your Windows Server machine.
- Open Server Manager by clicking its icon on the taskbar, or by searching for it in the Start menu.
Step 2: Add the DHCP Role
- In the Server Manager Dashboard, click on “Add roles and features.”
- Navigate through the wizard until you reach the “Roles” tab.
- Scroll down and check the “DHCP Server” role.
Step 3: Confirm Installation
- Click “Next” until you reach the “Confirm installation selections” screen.
- Confirm your settings and click “Install.”
- Wait for the installation process to complete.
Step 4: Post-Installation Configuration
- Once installed, go back to the Server Manager Dashboard.
- Click the yellow triangle on the top right to open the Notifications pane.
- Click “Complete DHCP configuration” and follow the on-screen instructions.
Step 5: Configure DHCP Scope
- Open the DHCP management console by clicking on “Tools” in the Server Manager, then select “DHCP.”
- In the DHCP console, right-click on your server and choose “New Scope.”
- Follow the New Scope Wizard, specifying the range of IP addresses to be allocated, lease durations, and other settings as needed.
Step 6: Authorize the DHCP Server
- In the DHCP console, right-click on your server and choose “Authorize.”
- Wait a few moments for the server to be authorized. You should see a green checkmark appear next to your server when the process is complete.
Step 7: Verify the Configuration
- Use a DHCP client to request an IP address from your new DHCP server.
- Check the DHCP leasing table in the DHCP console to confirm that the IP address has been successfully allocated.
Step 8: Advanced Settings (Optional)
- Reservations: You can reserve specific IP addresses for certain devices using their MAC addresses.
- Options: You can configure global or scope-specific options such as DNS servers, NTP servers, etc.
Troubleshooting:
- If the server isn’t authorizing, ensure that it is connected to the network and that you are using an administrative account.
- Check Windows Firewall settings to ensure that DHCP traffic is allowed.
By following these steps, you should have a functional DHCP server up and running on your Windows machine. The practical knowledge gained through this hands-on guide will deepen your understanding of DHCP and equip you for real-world applications.
17. Configuring a DHCP Server on Linux
For those running Linux environments, configuring a DHCP server can be a cost-effective and highly customizable solution. This comprehensive guide aims to walk you through the setup process, whether you’re doing this for educational purposes or implementing it in a live setting.
Prerequisites:
- A machine running a Linux distribution (Ubuntu, CentOS, etc.)
- Root or sudo access
- Basic familiarity with Linux terminal commands
- A text editor like Vim, Nano, or any of your choosing
Step 1: Update Your System
- Open your terminal.
- Update your package lists and packages:
sudo apt update && sudo apt upgrade  # For Ubuntu/Debian
sudo yum update                      # For CentOS/RHEL
Step 2: Install the DHCP Server Package
- Install the DHCP server package:
sudo apt install isc-dhcp-server    # For Ubuntu/Debian
sudo yum install dhcp               # For CentOS/RHEL
Step 3: Configure Interface
- Identify the network interface you wish to serve DHCP requests on:
ip addr
- Edit the DHCP server default settings:
sudo nano /etc/default/isc-dhcp-server # Ubuntu/Debian
Add your interface to the INTERFACESv4 or INTERFACESv6 line.
Step 4: Configure DHCP Settings
- Backup the original configuration file:
sudo cp /etc/dhcp/dhcpd.conf /etc/dhcp/dhcpd.conf.bak
- Open the configuration file for editing:
sudo nano /etc/dhcp/dhcpd.conf
- Add your DHCP settings. For example:
subnet 192.168.1.0 netmask 255.255.255.0 {
  range 192.168.1.10 192.168.1.50;
  option domain-name-servers 8.8.8.8, 8.8.4.4;
  option routers 192.168.1.1;
  option broadcast-address 192.168.1.255;
  default-lease-time 600;
  max-lease-time 7200;
}
Step 5: Start the DHCP Server
- Start and enable the DHCP service:
sudo systemctl start isc-dhcp-server  # Ubuntu/Debian
sudo systemctl enable isc-dhcp-server
Step 6: Firewall Configuration
- Allow DHCP traffic through the firewall:
sudo ufw allow 67/udp # Ubuntu/Debian
Step 7: Testing and Verification
- Test the DHCP server by connecting a DHCP client to the network.
- Verify that the client receives an IP address from the range you specified.
Troubleshooting:
- Run
sudo systemctl status isc-dhcp-serverto check the service status. - Examine logs for issues:
cat /var/log/syslog | grep dhcp
Step 8: Advanced Settings (Optional)
- Static IP Assignments: You can assign static IPs by specifying host blocks in
dhcpd.conf. - Option Modification: You can customize options like DNS and NTP directly in
dhcpd.conf.
By completing these steps, you should have a fully functional DHCP server running on your Linux machine. This hands-on guide aims to give you both the theoretical and practical tools needed to manage DHCP effectively in Linux environments.
18. DHCP Troubleshooting
Troubleshooting is an essential skill for anyone involved in network management. Despite DHCP’s relative simplicity, things can go wrong. Whether you’re facing IP conflicts or server authorization issues, the following guide aims to address the most common DHCP problems and their solutions.
Issue 1: DHCP Server Not Responding
Symptoms:
- Clients unable to obtain IP addresses
- Server status showing as inactive or disabled
Solution:
- Check the server’s network connectivity.
- Restart the DHCP service:
sudo systemctl restart isc-dhcp-server  # Linux
Restart-Service DHCPServer               # Windows PowerShell
- Verify firewall rules to ensure DHCP traffic is allowed.
Issue 2: IP Address Conflicts
Symptoms:
- Network instability
- Error messages indicating IP address conflict on client machines
Solution:
- Review DHCP leasing table to identify duplicates.
- Delete conflicting leases from the DHCP server.
- Check for statically assigned IPs that may conflict with the DHCP scope.
Issue 3: Limited IP Addresses Available
Symptoms:
- New devices unable to join the network
- DHCP scope exhaustion warnings
Solution:
- Extend the DHCP scope to include additional IP ranges.
- Decrease lease time to release unused IP addresses faster.
Issue 4: Incorrect DHCP Options
Symptoms:
- Incorrect DNS settings
- Wrong gateway configuration
Solution:
- Verify and modify DHCP options like DNS servers, default gateway, and more.
- Renew leases on client machines to apply the new settings.
Issue 5: Unauthorized DHCP Servers
Symptoms:
- Unpredictable network behavior
- Multiple DHCP servers detected on the network
Solution:
- Identify unauthorized servers using network scanning tools.
- Remove or authorize the rogue DHCP servers.
Issue 6: Lease Time and Renewal Issues
Symptoms:
- Frequent disconnections
- Lease not renewing automatically
Solution:
- Check and adjust the default and maximum lease time settings.
- Restart the DHCP service to apply the changes.
Issue 7: DHCP Server Authorization Issues (Windows only)
Symptoms:
- Server failing to issue addresses
- Server status shows as unauthorized
Solution:
- Open DHCP Management Console.
- Right-click the server and choose “Authorize.”
- Wait for the server to be authorized; this may take a few minutes.
General Tips:
- Always check server logs for more detailed error information.
cat /var/log/syslog | grep dhcp # Linux
- Utilize network monitoring tools to watch DHCP traffic and identify irregularities.
By understanding these common DHCP issues and their resolutions, you’ll be better prepared to manage and maintain a reliable network. Troubleshooting is part and parcel of network management, and mastering it can save you both time and resources.
19. Use-Case: DHCP in a Home Network
The Setting:
In a typical home network, the Dynamic Host Configuration Protocol service often resides in the wireless router that provides Internet access. Devices like smartphones, laptops, smart TVs, and IoT gadgets connect to this network.
How It Works:
- Device Connection: When a new device connects to the Wi-Fi, it sends a DHCP Discover message.
- IP Allocation: The router’s DHCP server responds with an Offer message, providing an available IP address.
- Lease Time: Home networks usually have longer lease times (24 hours or more) due to fewer devices and less frequent changes.
- Other Settings: Along with the IP address, the DHCP server often provides additional information like the default gateway (usually the router itself) and DNS servers.
Why It’s Ideal:
- Simplicity: For non-tech-savvy individuals, DHCP automates network configurations, making it user-friendly.
- Resource-Efficient: Home networks rarely exhaust the IP pool, making DHCP a resource-efficient solution.
20. Use-Case: DHCP in Enterprise Networks
The Setting:
Enterprise networks are considerably more complex, consisting of multiple VLANs, subnets, and potentially hundreds or thousands of connected devices. Here, a dedicated DHCP server, or even multiple servers, is common.
How It Works:
- DHCP Scopes: For different subnets and VLANs, administrators define multiple scopes.
- Load Balancing: In larger setups, DHCP services might be distributed across multiple servers for load balancing.
- Lease Time: Generally shorter than in home networks to accommodate the frequent addition and removal of devices.
- Options: DHCP options may include complex settings, such as VoIP configurations, multiple gateway addresses, or even vendor-specific information.
Scaling Techniques:
- DHCP Relay: Allows DHCP servers to provide IP addresses across different subnets or VLANs.
- Failover: Multiple DHCP servers share responsibility, providing high availability.
- Reservation: For critical devices like servers and printers, reserved IP addresses are set.
Why It’s Ideal:
- Flexibility: DHCP can be fine-tuned to meet the specific requirements of an enterprise network.
- Efficiency: Centralized management makes it easier to apply network policies.
21. Advanced Dynamic Host Configuration Protocol Features
While DHCP is often employed for its basic functionality of assigning IP addresses, it has the capability to do much more. Here are some advanced features that you may encounter or implement in sophisticated network environments.
DHCP Snooping
- What it is: A security feature that filters out unauthorized DHCP messages.
- Why it’s Important: Helps to mitigate rogue DHCP server attacks.
Dynamic DNS Updates
- What it is: Automatic DNS record updating when DHCP assigns a new IP address.
- Why it’s Important: Simplifies DNS management, particularly useful in large networks.
Option 82 – Relay Agent Information
- What it is: A field added by DHCP relay agents, used for policy implementation or logging.
- Why it’s Important: Allows network operators to associate leases with specific client attributes.
Vendor-Specific Information
- What it is: Option 43 allows vendors to pass proprietary parameters to Dynamic Host Configuration Protocol clients.
- Why it’s Important: Enables specialized configurations, such as VoIP phone settings.
DHCP Guard
- What it is: A feature that prevents unauthorized devices from acting as DHCP servers.
- Why it’s Important: Strengthens network security by blocking rogue DHCP servers.
Part IV: Extra Content
22. Video Explainer: How Your PC Gets Its IP Address?
A small video explaining the concept of DHCP, an application-layer protocol that your own computer probably uses to get an IP address from your network.
23. Further Reading
To further expand your knowledge and understanding of Dynamic Host Configuration Protocol, the following resources are highly recommended:
Books
- “DHCP Handbook” by Ralph Droms and Ted Lemon
- “TCP/IP Network Administration” by Craig Hunt
RFCs (Request for Comments)
Academic Papers
- “Security Risks in Asynchronous Web Servers: When Performance Optimizations Amplify the Impact of Data-Oriented Attacks”
These materials will provide you with the technical background, implementation guidelines, and a deep understanding of the protocol’s internals, offering both historical context and insights into future developments.